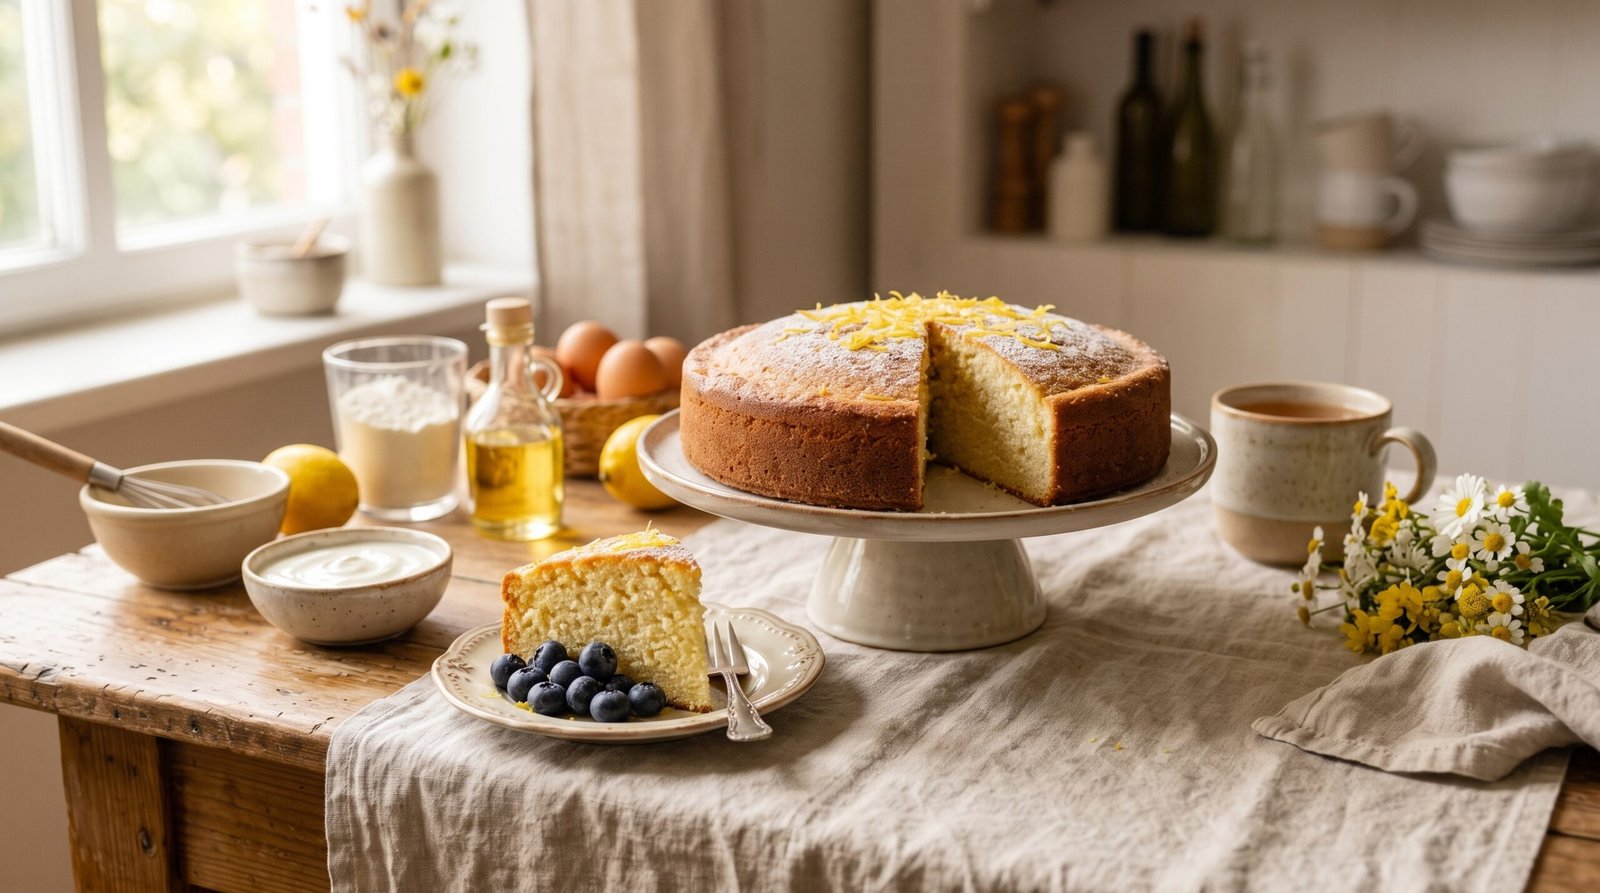
There are some homemade cakes that are worth keeping in your recipe collection simply because they are easy to make, versatile, and enjoyable any time of day.
This yogurt cake is one of them.
Made with plain yogurt, eggs, oil, sugar, flour, and baking powder, it has a soft and tender texture without requiring frosting, layers, or complicated decorating. The yogurt adds moisture to the batter, while the oil helps keep the cake soft.
You can enjoy it as a simple afternoon treat with coffee or tea, serve it with fresh berries, or finish it with a light dusting of powdered sugar.
The basic recipe is also easy to personalize. Vanilla gives it a classic flavor, while lemon zest adds a fresh citrus note.
If you have plain yogurt in your refrigerator and want to make a homemade cake without a complicated process, this is a recipe worth trying.
Why Yogurt Makes This Cake Moist
Yogurt is more than just an ingredient that adds flavor.
Because yogurt contains moisture and has a mild acidity, it can contribute to the texture of baked goods. In this cake, it works together with the eggs, oil, flour, sugar, and baking powder to create a tender crumb.
The oil also plays an important role. Unlike butter, which becomes firm as it cools, vegetable oil remains liquid, helping the cake maintain a soft texture.
For the best result with this particular recipe, use plain yogurt rather than flavored yogurt. Flavored varieties can contain additional sugar and ingredients that may change the flavor and balance of the batter.
The consistency of the yogurt can also make a difference. Regular plain yogurt is the closest match to the ingredient used in this recipe.
What Makes This Yogurt Cake So Easy?
You don’t need a stand mixer or complicated equipment to make this cake.
A large mixing bowl, a whisk or spatula, measuring cups and spoons, a cake pan, and an oven are enough.
The preparation is straightforward: combine the wet ingredients, add the dry ingredients, transfer the batter to the pan, and bake.
There is also no frosting or filling that needs to be prepared separately.
That makes this yogurt cake useful when you want something homemade without turning baking into a long project.
Simple Yogurt Cake Ingredients
Here is everything you need for the recipe.
Ingredients
- 1 container (6 ounces / 170 g) plain yogurt
- 3 large eggs
- ½ cup (120 ml) sunflower oil or melted coconut oil
- 1½ cups granulated sugar
- 2 cups all-purpose flour
- 1 tablespoon baking powder
- 1 teaspoon vanilla extract, optional
- 1 teaspoon finely grated lemon zest, optional
- A small pinch of salt

A Note About the Ingredients
Each ingredient has a specific role in the cake.
Plain yogurt contributes moisture and tenderness while adding a subtle tang.
Eggs provide structure and help bind the ingredients together.
Sunflower oil helps create a soft texture. Melted coconut oil can be used instead, as specified in the recipe.
Sugar provides sweetness and contributes to the texture and browning of the cake.
All-purpose flour provides the structure needed for the cake.
Baking powder helps the cake rise during baking.
Vanilla extract and lemon zest are optional flavor additions. You can use either one, both, or neither.
How to Make Yogurt Cake
1. Preheat the Oven and Prepare the Pan
Preheat your oven to 350°F (180°C).
Grease your cake pan thoroughly.
If you want to make removing the cake easier, line the bottom of the pan with parchment paper after greasing it.
Preparing the pan before mixing the batter means the cake can go into the oven as soon as the batter is ready.
2. Mix the Eggs and Sugar
Add the eggs and granulated sugar to a large mixing bowl.
Whisk until the eggs and sugar are well combined.
There is no need to whip the mixture into a thick foam. Simply make sure the ingredients are evenly mixed.
3. Add the Yogurt and Oil
Add the plain yogurt and sunflower oil or melted coconut oil.
Whisk until the mixture is smooth and evenly combined.
If you are using vanilla extract or lemon zest, add them at this stage.
The mixture should be relatively loose and creamy before the dry ingredients are added.
4. Add the Flour, Baking Powder, and Salt
In a separate bowl, combine the all-purpose flour, baking powder, and salt.
Gradually add the dry ingredients to the yogurt mixture.
Stir gently with a whisk or spatula until the flour has been incorporated.
Avoid overmixing.
Once you no longer see large areas of dry flour, stop stirring. Overmixing can encourage gluten development and make the finished cake less tender.
The batter does not need to be perfectly smooth.
5. Transfer the Batter to the Pan
Pour the batter into the prepared cake pan.
Use a spatula to gently spread the batter into an even layer.
Place the pan in the center of the preheated oven.
How Long Does Yogurt Cake Take to Bake?
Bake the cake at 350°F (180°C) for approximately 35 to 40 minutes.
The exact baking time can vary depending on your oven and the pan you use, so treat the time as a guideline rather than an absolute rule.
As the cake approaches the end of the baking time, look at the top and check the center.
The cake should be lightly golden and the center should look set rather than wet.
Insert a toothpick or cake tester into the center.
If it comes out clean or with a few moist crumbs attached, the cake is ready.
If the toothpick has wet batter on it, continue baking for a few more minutes and test again.
How to Know When the Cake Is Done
The toothpick test is one of the easiest ways to check a cake, but it isn’t the only sign to look for.
A properly baked yogurt cake should have:
- a lightly golden surface;
- a center that looks set;
- a gently springy texture when lightly touched;
- edges that may begin to pull slightly away from the pan;
- a toothpick that comes out clean or with a few moist crumbs.
Be careful not to overbake the cake simply because you want the toothpick to come out completely dry.
A few moist crumbs are normal.
The goal is a cake that is baked through while still retaining its tender texture.
Don’t Open the Oven Too Early
Try to avoid repeatedly opening the oven door while the cake is still rising.
Every time the oven door opens, heat escapes, which can affect the baking environment.
Instead, allow the cake to bake undisturbed during the early part of the baking process.
Once you are close to the end of the suggested baking time, you can open the oven and check the cake.
A Helpful Baking Reference
If you are still learning how different ingredients and baking techniques affect homemade cakes, a reliable baking reference can be useful.
This King Arthur Baking Recipe Success Guide offers general baking guidance that can help when working with recipes and troubleshooting common baking issues. offers general baking guidance that can help when working with recipes and troubleshooting common baking results.
Let the Cake Cool Before Slicing
When the cake comes out of the oven, allow it to cool in the pan for approximately 10 to 15 minutes.
Then carefully remove it from the pan and transfer it to a cooling rack or serving plate.
It can be tempting to slice a freshly baked cake immediately, but allowing it to cool gives the crumb time to settle.
A very hot cake is more delicate and can break more easily when sliced.
Once the cake has cooled enough to handle comfortably, it is ready to serve.

Easy Ways to Serve Yogurt Cake
This cake doesn’t need elaborate decoration to look beautiful on the table.
For the simplest presentation, dust the cooled cake with powdered sugar just before serving.
Fresh fruit is another easy option.
Try serving a slice with:
- strawberries;
- blueberries;
- raspberries;
- peaches;
- or other seasonal fruit.
You can also serve it alongside coffee or tea.
The cake’s mild flavor makes it easy to pair with different toppings and beverages without overwhelming them.
For a casual gathering, arrange slices on a serving plate and add fresh berries around the cake.
How to Add Lemon Flavor
Lemon zest is an easy way to give the cake a brighter flavor.
The recipe includes 1 teaspoon of finely grated lemon zest, which can be added with the yogurt and oil.
When zesting the lemon, grate only the thin yellow outer layer of the peel. The white layer underneath, known as the pith, can have a more bitter flavor.
The lemon zest adds fragrance and citrus flavor without changing the basic structure of the cake.
For a simple presentation, serve lemon-flavored yogurt cake with fresh berries and a light dusting of powdered sugar.
How to Add Vanilla Flavor
For a classic homemade cake flavor, add 1 teaspoon of vanilla extract.
Vanilla is optional and should be added with the wet ingredients.
It works especially well when paired with the mild tang of plain yogurt.
You can also combine the vanilla with the optional lemon zest if you want both flavors in the finished cake.
If you prefer a very simple cake, you can leave both flavorings out.
Can You Use Greek Yogurt?
Greek yogurt can be used as a substitution experiment, but it is not the exact yogurt specified in this recipe.
Greek yogurt is generally thicker than regular plain yogurt. That difference can affect the consistency of the batter and potentially the texture of the finished cake.
If you want to make the recipe as written, regular plain yogurt is the better choice.
It is also best to avoid replacing the plain yogurt with a heavily sweetened or flavored yogurt if you want the original flavor and balance of the recipe.
Baking substitutions can change moisture, sweetness, and consistency, so keeping the main ingredients consistent is the safest approach.
Sunflower Oil or Coconut Oil?
The recipe gives you two options:
½ cup sunflower oil or melted coconut oil.
Sunflower oil has a neutral flavor and works well when you want the yogurt and optional flavorings to remain the focus.
Melted coconut oil can also be used and may add a subtle coconut flavor depending on the type of oil.
If you use coconut oil, melt it before adding it to the batter.
Let it cool slightly if it is very hot. Extremely hot oil should not be poured directly into a mixture containing eggs.
Both options are part of this recipe, so choose the one you prefer.
How to Measure the Flour Correctly
Flour is one ingredient where measuring technique can make a noticeable difference.
For this recipe, use 2 cups of all-purpose flour.
If you are measuring with cups, avoid packing the flour tightly into the measuring cup.
Instead, use the spoon-and-level method:
- Fluff the flour lightly in its container.
- Spoon it into the measuring cup.
- Fill the cup without pressing the flour down.
- Level the top with the straight edge of a knife.
Too much flour can make the batter thicker than intended and can contribute to a denser cake.
If you have a kitchen scale, weighing flour can provide even greater consistency, but careful cup measurement works well for this recipe.
Why You Shouldn’t Overmix the Batter
Once flour is added to a cake batter, mixing activates gluten-forming proteins.
Some gluten development is necessary for structure, but excessive mixing can make the finished cake tougher.
For that reason, stir the batter only until the flour has been incorporated.
You don’t need to keep mixing in an attempt to make every tiny lump disappear.
A gentle hand at this stage helps preserve the tender texture you want from the finished yogurt cake.
What If the Batter Looks Thicker Than Expected?
The consistency of the batter can vary slightly depending on the yogurt and how the flour was measured.
For that reason, don’t immediately add extra milk, yogurt, or another liquid if your batter looks somewhat thick.
Adding an unlisted ingredient changes the balance of the recipe and may affect the final result.
Instead, make sure the flour was measured correctly and that the yogurt used has a consistency reasonably similar to regular plain yogurt.
The batter should be pourable and spreadable in the prepared pan.
How to Store Yogurt Cake
Allow the cake to cool completely before storing it.
Place it in an airtight container or wrap it well to help prevent it from drying out.
For short-term storage, the cake can be kept at room temperature in a cool, dry environment.
If you prefer to refrigerate it, let a slice sit at room temperature briefly before serving so it can soften slightly.
Avoid leaving the cake uncovered for long periods because exposure to air can gradually dry the crumb.
Can You Freeze Yogurt Cake?
Yes, the baked cake can be frozen.
Allow it to cool completely before freezing.
You can freeze the cake whole, but individual slices are often more convenient.
Wrap each slice securely and place the portions in a freezer-safe container or bag.
When you’re ready to enjoy one, allow it to thaw before serving.
Freezing individual portions can be especially useful when you know you won’t finish the entire cake within a few days.
Simple Ways to Make the Cake Feel Special
A simple cake can still look beautiful without complicated decorating.
A few small additions can completely change the presentation.
For a classic look, dust the top with powdered sugar.
For a fresh dessert, add berries.
For an afternoon coffee break, serve a slice on a small plate beside your favorite warm drink.
For a gathering, arrange several slices on a serving platter and add fresh fruit around them.
You don’t need to transform the cake into something completely different.
The simplicity is part of its appeal.
A Cake for Everyday Moments
Not every homemade dessert needs to be saved for a birthday, holiday, or special celebration.
Sometimes baking is simply a way to create something comforting for an ordinary day.
A freshly baked cake on the kitchen counter can turn an afternoon coffee into a small moment to enjoy.
If you enjoy finding beauty and meaning in simple everyday moments, you may also enjoy our article about gratitude and the small things we often overlook.
The connection is simple: both cooking and everyday routines can create small moments that are easy to appreciate when we slow down enough to notice them.
Why This Yogurt Cake Is Worth Keeping
Some recipes become favorites because they are impressive.
Others become favorites because they are dependable.
This yogurt cake falls into the second category.
The ingredient list is straightforward, the preparation doesn’t require complicated techniques, and the finished cake can be served in several different ways.
You can keep it completely simple or add your own touch with vanilla, lemon zest, powdered sugar, or fresh fruit.
It works for an afternoon snack, a casual dessert, or a simple treat alongside coffee or tea.
Most importantly, you don’t need a special occasion to make it.
A Simple Cake Worth Making Again
A good homemade cake doesn’t need a complicated recipe to feel special.
This yogurt cake combines plain yogurt, eggs, oil, sugar, flour, and baking powder to create a soft, tender dessert that is easy to serve and easy to adapt.
The optional vanilla and lemon zest allow you to change the flavor without changing the basic recipe. Serve it with fresh berries, dust it with powdered sugar, or simply enjoy a slice alongside your favorite coffee or tea.
Because it doesn’t require frosting or elaborate decoration, this is the kind of recipe that can fit naturally into an ordinary day.
Sometimes, that’s exactly what makes a homemade cake worth making again: simple ingredients, a straightforward method, and a result everyone can enjoy.

Post Comment